 Save
Save Begin by baking a thin oat cookie sheet, then pulse it to fine crumbs and bind with melted butter to line a 9-inch dish. Whisk sugars, milk powder and flour, add melted butter, cream and vanilla, then gently fold in yolks. Bake until edges set and center still trembles, cool fully and refrigerate to firm. Dust with powdered sugar and slice with a hot knife for clean portions.
Something shifted in my kitchen the afternoon I pulled my first crack pie from the oven, its center still doing that slow hypnotic wobble that tells you everything is about to go wonderfully wrong with your self control. The smell alone, brown butter and caramelized sugar doing a lazy dance through every room, was enough to make my neighbor knock on the door asking what on earth I was making. I barely got it into the fridge before sneaking a warm spoonful from the edge, and honestly that first bite rewired something deep in my dessert loving brain. This recipe is my version of the legendary Milk Bar creation, and it is every bit as dangerous as the original promises to be.
I brought this to a friends potluck once and watched three otherwise composed adults quietly argue over who got the last corner piece with the most crust. Someone literally hid a slice behind the mustard in the fridge, and I cannot even blame them because I would have done the same thing. That pie dish came home licked clean, not a single crumb left behind, and my phone blew up with texts for the recipe before I even got home.
Ingredients
- Unsalted butter (for cookie and crust): You need softened butter for the cookie and melted for the crust assembly, and using a good quality European style butter makes the richness sing.
- Light brown sugar and granulated sugar: The dual sugar situation in both the crust and filling creates layers of caramel depth that single sugar cannot touch.
- Rolled oats: Old fashioned rolled oats give the cookie base its signature chew and toasty flavor, so do not substitute quick oats here.
- All purpose flour: Acts as structure in the cookie and a thickening agent in the filling, keeping everything held together without turning dense.
- Dry milk powder: This is the secret weapon that gives the filling its signature tangy depth and helps achieve that chewy custard texture.
- Heavy cream: Adds luxurious richness to the filling and helps create that perfectly gooey interior.
- Vanilla extract: A generous two teaspoons rounds out the sweetness and brings warmth to every bite.
- Large egg yolks: Eight yolks might seem excessive but they are the backbone of that impossibly rich custard filling.
- Fine salt: Do not skip this, because salt is what turns a sweet pie into something completely addictive and balanced.
- Baking powder and baking soda: Just a pinch of each gives the oat cookie a slight lift so it is not a flat hockey puck.
Instructions
- Bake the oat cookie slab:
- Preheat your oven to 350 degrees Fahrenheit and line a baking sheet with parchment. Cream the softened butter with both sugars until fluffy, beat in the whole egg, then fold in the oats, flour, baking powder, baking soda, and salt until a thick batter forms. Spread it into a thin even layer on your sheet and bake for about 15 minutes until deeply golden and fragrant.
- Transform cookie into crust:
- Let the cookie cool completely, then break it into chunks and pulse in a food processor until you have fine crumbs. Add melted butter, brown sugar, and salt then pulse until the mixture clumps together when you squeeze it in your fist. Press firmly and evenly into the bottom and up the sides of a 9 inch pie dish.
- Mix the gooey filling:
- Reduce the oven to 325 degrees Fahrenheit. Whisk both sugars with the milk powder, flour, and salt in a large bowl until no lumps remain. Pour in melted butter and stir until smooth, then add the cream and vanilla. Gently fold in the egg yolks until just combined, being careful not to whip air into the mixture.
- Bake until barely set:
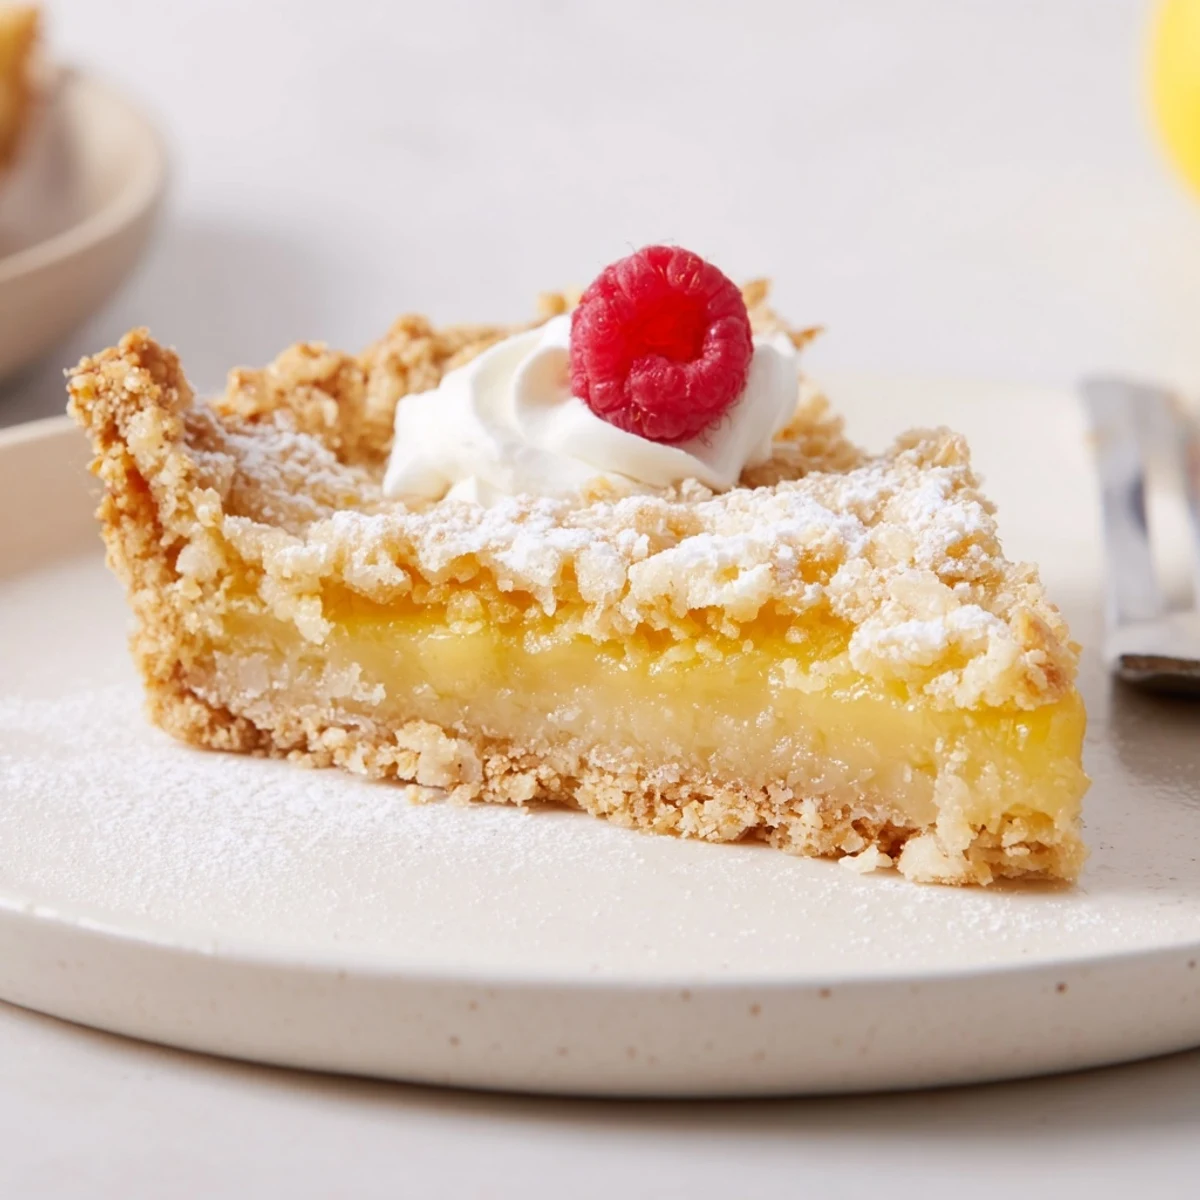
- Pour the filling into your prepared crust and set the pie dish on a baking sheet to catch any spills. Bake for 25 to 30 minutes, watching for edges that are set but a center that still jiggles like gelatin when you gently shake the pan. That wobble is exactly what you want because it will set as it chills.
- Chill into perfection:
- Cool the pie completely on a wire rack, then transfer to the refrigerator for at least two hours or preferably overnight. The overnight rest transforms the texture from good to absolutely transcendent. Dust generously with powdered sugar right before slicing and serving.
 Save
Save The first time I served this chilled and dusted with powdered sugar at a dinner party, the table went completely silent for about thirty seconds, which is the highest compliment any dessert can receive. My friend David looked up with powdered sugar on his lip and simply said this is a problem, meaning he could not stop eating it, and we have since renamed it the relationship ender in our house because sharing is genuinely difficult.
Getting That Clean Slice
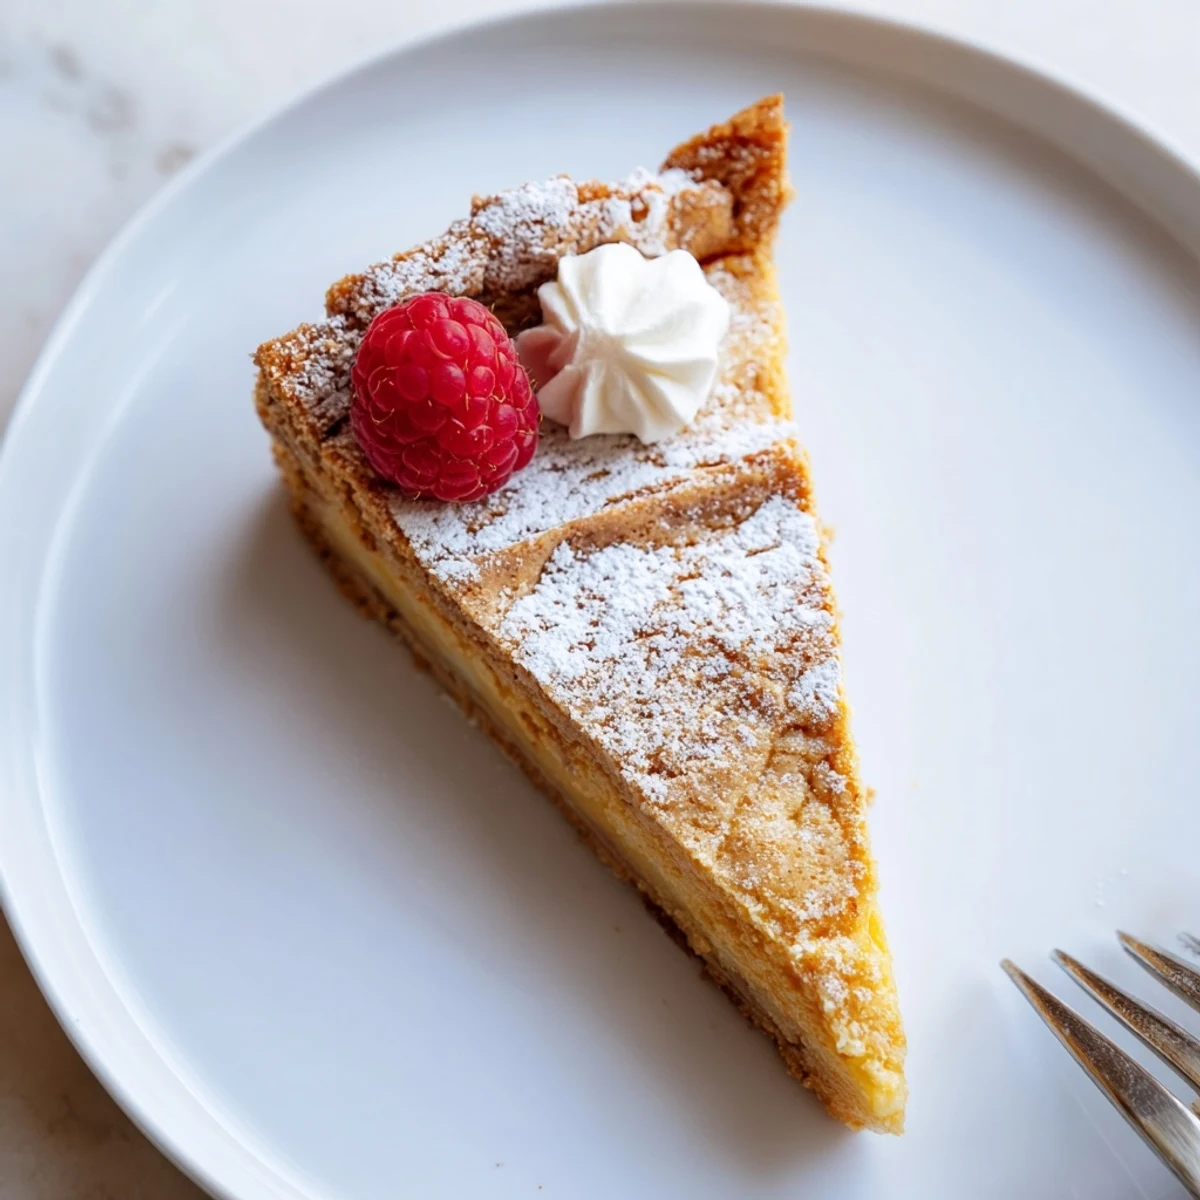
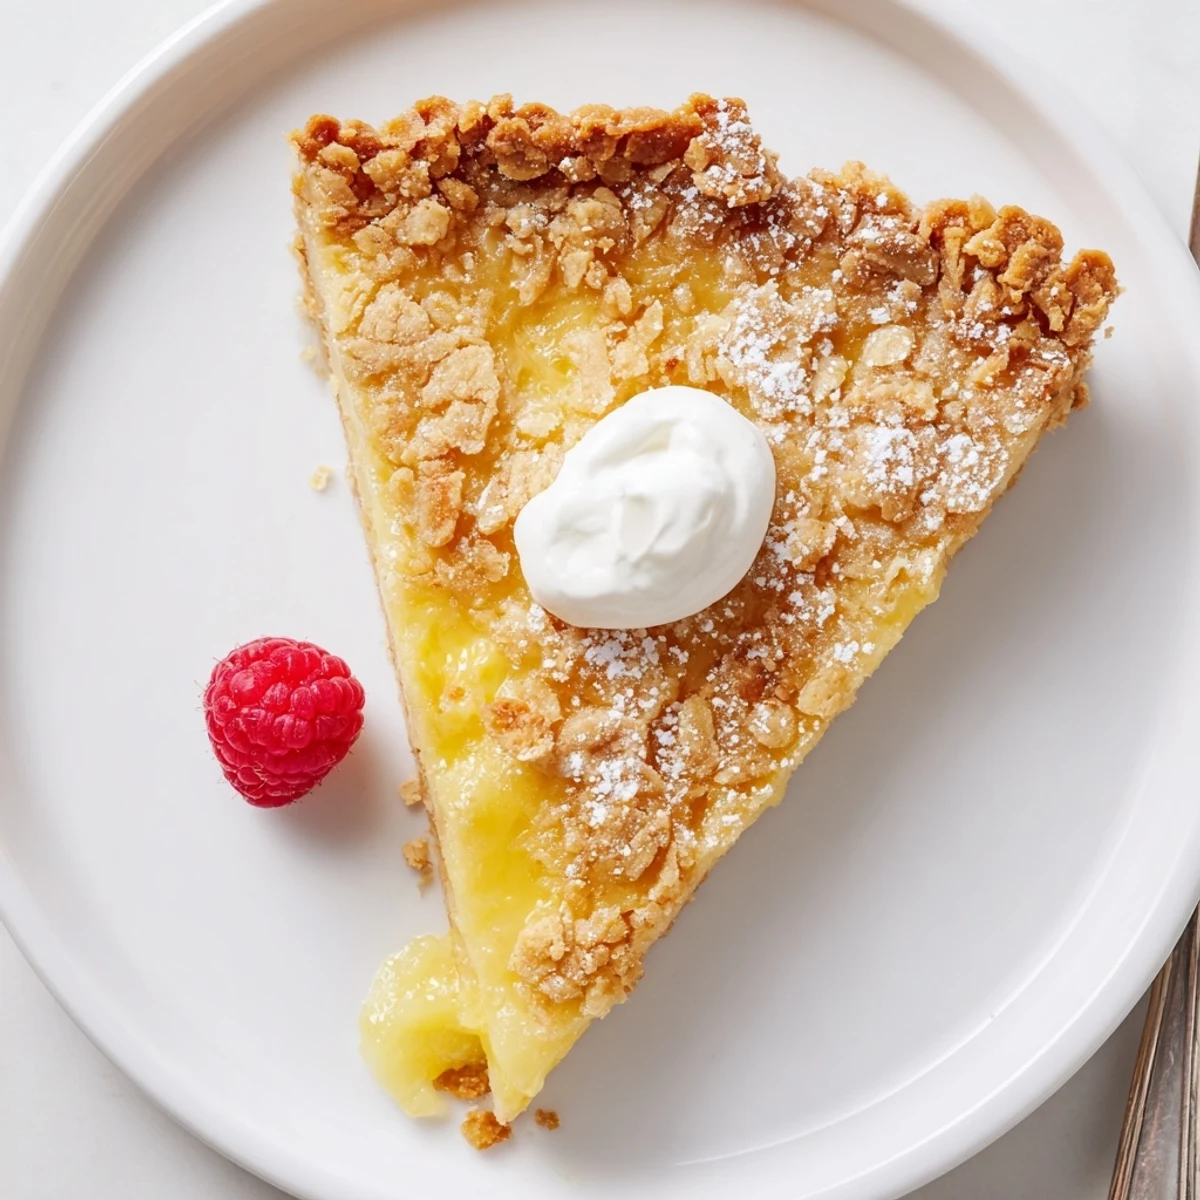
Run your knife under hot water and wipe it dry between every single cut, because this filling will cling and smear if you rush. A heated knife glides through that gooey center like butter and gives you those gorgeous bakery style slices that make people think you bought it instead of made it.
Storage That Keeps It Perfect
This pie actually tastes better on day two when the filling has fully set into that chewy custard texture, so making it ahead is not just acceptable but actively encouraged. Wrap it tightly in plastic and it will keep beautifully in the fridge for up to five days, though in my experience it never lasts past day three.
Serving Suggestions Worth Trying
A thin slice of crack pie with a dollop of barely sweetened whipped cream and a few fresh raspberries on the side creates a beautiful contrast between rich and bright. The tartness of berries cuts through all that buttery sweetness in a way that makes you feel slightly more virtuous about going back for seconds. A cup of black coffee alongside is not optional, it is essential.
- Try a sprinkle of flaky sea salt on top right before serving for an extra dimension of flavor.
- Freeze individual slices wrapped tightly for up to one month and eat them slightly thawed like the most indulgent ice cream bar.
- Always let chilled pie sit at room temperature for about ten minutes before slicing so the filling softens to its best texture.
 Save
Save Some desserts are merely good, but crack pie is the kind of recipe that becomes part of your permanent rotation the moment you taste it. Trust the wobble, trust the chill, and watch everyone you serve it to become completely helpless around it.
Recipe FAQs
- → How do I achieve a chewy oat crust?
-
Bake the pressed oat layer until golden but not overbrowned, then pulse into fine crumbs and bind with melted butter. Press firmly into the pan so it holds together after baking.
- → Why should yolks be folded gently?
-
Overmixing yolks incorporates air and can cause the filling to puff and crack. Gentle folding yields a dense, gooey center with a smooth texture.
- → How long should the pie chill before slicing?
-
Cool completely on a rack, then refrigerate at least 2 hours, preferably overnight, to let the filling set for clean slices.
- → Can I make substitutions for cream or flour?
-
Use full-fat dairy alternatives for similar richness; for flour, a 1:1 gluten-free blend can work if paired with certified gluten-free oats.
- → What indicates the pie is done baking?
-
Edges should be set and the center should still have a slight wobble—residual heat will finish the cooking as it cools.
- → Any tips for neat slices and serving?
-
Heat a knife in hot water and wipe between cuts for clean portions. Serve chilled, with optional whipped cream or fresh berries to balance richness.
